


Getting Started
The following steps will guide you through preparation, installation and configuration of SNAP.
Step 1: Obtain Access
If you have not already done so, create an account on the SNAP website for the “point of contact” for your organization. Email addresses for accounts must be associated with the organization requesting access. Non-business accounts on gmail, hotmail, etc... cannot be used to download software. The “point of contact” must be the same person identified in the non-disclosure agreements. If multiple points of contact are desired, please make sure they are also listed on the signed copy of the non-disclosure agreements.
Complete and submit signed agreements for access to SNAP and the SNAP plug-ins.
Step 2: Software Prerequisites
SNAP and AptPlot are packaged in APT's Java installation software which simplifies the installation and update process and provides platform specific launchers for the various Java applications. The SNAP installer requires a Java 8.0 or later Virtual Machine (JVM). This can be either an Oracle Java SE or OpenJVM distribution.
SNAP is bundled with it's own OpenJVM for the following platforms:
- Microsoft Windows 64-bit. (AMD64/Intel-64)
- Linux 64 bit (AMD64/Intel-64)
After installation the bundled JVM will be used to run SNAP and AptPlot applications on these platforms. If your platform is not listed above, for example if you are installing onto a 32-bit Microsoft Windows or MAC OSX platform SNAP will default to using the JVM used to run the installer.
Please note that some early Java 8 versions may have difficulty connecting the the website due to their inability to validate newer certificates. Updating to the latest version of Java should correct this issue.
Optionally, you can install the latest version of jEdit from www.jedit.org. This will allow you to open model input files in jEdit directly from SNAP.
Depending on where you install the software, you may require administrative privileges. Please check with your system administrator to verify that you have proper system access.
-
Step 4: Close any Open SNAP Applications
Stop the Calculation Server if it is running and close any open SNAP applications. You should also close any jEdit windows if you are using the jEdit SNAP plug-in.
This version of SNAP should not be installed in the same directory as a 2.6.9 or earlier release. Please uninstall any pre 3.0.0 versions or install to a new directory.
If you encounter any issues with the installation process just delete the installation an installl to an empty directory.
-
Step 3: Download the Installer
Download the SNAP Installer to a local directory.
- Start the Installer
-
Select the installation method.
Under Windows you should be able to double-click on the jar file from Windows Explorer to launch the application. If your system does not automatically launch jar files in this manner, open a shell (i.e. DOS Command Window or Bash Shell), change to the directory where you downloaded the installer, and run the command:
<Path to your Java Installation>/java -jar SnapInstaller.jar
This should open an installer dialog that will prompt you for the location to install the Application along with any installation options.
If you receive the message:
"Unable to connect to update server. (sun.security.validator.ValidatorException:
PKIX path building failed: sun.security.provider.certpath.SunCertPathBuilderException:
unable to find valid certification path to requested target)"
this indicates that you are using an older version of Java that cannot validate the newer higher security certificates required by the website. Updating to the latest Java VM should correct this issue.
The SNAP Installer will appear. 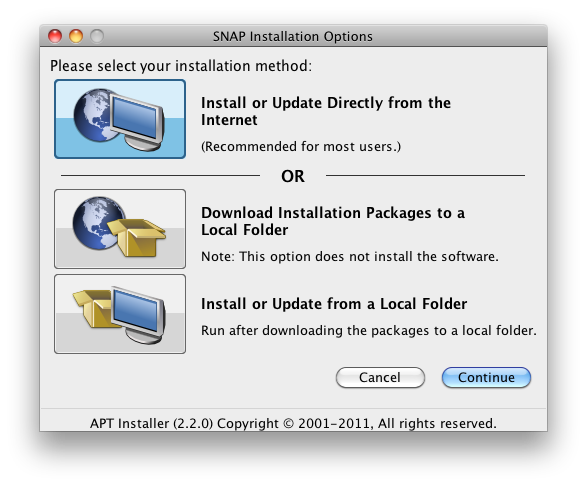
The initial stages of the SNAP installation can follow two routes. The large buttons shown in the installer are used to select whether the SNAP installation will be performed directly from the internet (the first option) or as a two-stage fetch and install process (the latter two options). The internet installation is the simplest method and recommended for most users. The two-stage method is recommended for administrators that want to download the installation packages once, distribute them to multiple machines, and then install from the cached files.
At this point, the installation instructions vary depending on the installation method.
Install or Update Directly from the Internet
- Select the first button and press Continue.
- You will be asked for your login credentials. These are the same as those used for this website.
- The main installation window will appear, with a prompt asking where SNAP should be installed. If you do not want to use the standard location, enter the appropriate folder path, then press OK.
- The SNAP License will be displayed. After reading the license, you must select the Agree button and press OK to continue.
- The installation will continue by retrieving and unpacking the files required for SNAP. You will not need to provide additional input until the Plug-in Manager is shown.
- At the Plug-in Manager, select the plug-ins needed for the SNAP installation, then press OK.
The installation will proceed by downloading and unpacking the plug-in files. Afterwards, the SNAP installation is complete.
Download Installation Packages to a Local Folder
- Select the second button. A text field will appear at the bottom of the installer. This indicates the folder that the installer will download installation packages into. The button to the right of the field can be used to select the folder with a file browser.
- Press the Continue button.
- You will be asked for your login credentials. These are the same as those used for this website.
- The Download Manager window will appear, asking which packages should be retrieved. Select SNAP and the plug-ins you wish to download, then press Continue.
The installer will download the installation packages and then notify you when the process is complete.
Close the installer.
- To install the downloaded packages, restart the installer and follow the instructions below to Install or Update from a Local Folder.
Install or Update from a Local Folder
Note: You must download the installation packages to a locally accessible folder before you can follow these steps.
- Select the third button. A text field will appear at the bottom of the installer. This indicates the folder containing the installation packages. The button to the right of the field can be used to select an alternate folder containing the downloaded packages.
- Press the Continue button.
- The main installation window will appear, with a prompt asking where SNAP should be installed. If you do not want to use the standard location, enter the appropriate folder path, then press OK.
- The SNAP License will be displayed. After reading the license, you must select the Agree button and press OK to continue.
- At the Plug-in Manager, select the plug-ins needed for the SNAP installation, then press OK.
The installation will proceed unpack the plug-in files. Afterwards, the SNAP installation is complete.
- Step 6: Test the Installation
- Under Windows: Open the Start Menu, Select All Programs, Select the Program Group SNAP, then Select Model Editor.
Under Linux, MAC OSX, Unix, etc, Run the model_editor.sh Shell Script located in the bin directory of the installation.
The application should start and open in the display.
Post Installation:
SNAP should now be installed for your system. Please refer to the Post-Installation and Configuration instructions for more information. If you're new to SNAP, you can also find several tutorials here.